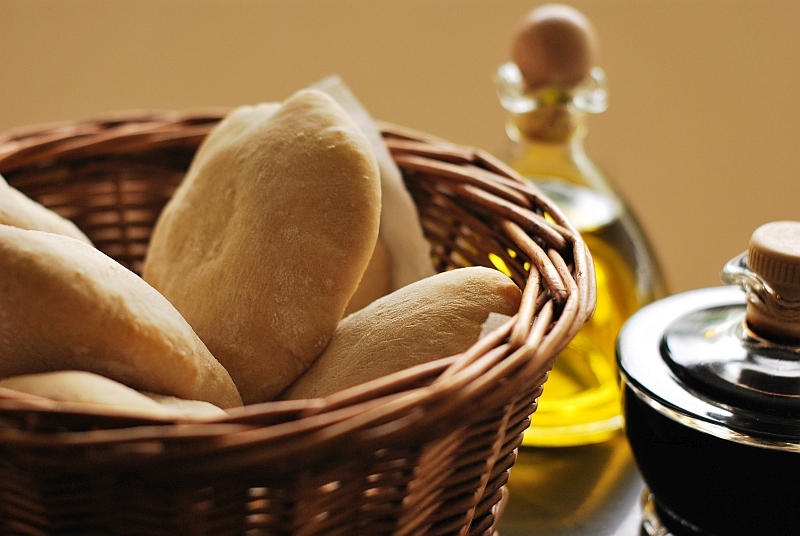
Sourdough pita bread
I am a massive fan of sourdough baking and published probably at least half a dozen sourdough related recipes already. One of my first sourdough related recipes was about creating your own sourdough starter also known as mother. My current starters are now about 2 years old and in order to keep them active and healthy I need to feed them regularly. Unless you bake a lot of bread this would normally require discarding part of the starter and feeding it with fresh flour and water. I hate wasting food though, including perfectly good sourdough mother. So I had to come up with ideas of how to use the excess sourdough starter. If you think about it there are multiple possibilities: sourdough pancakes, sourdough waffles, muffins. I make all of them regularly. But one of my favourite has to be sourdough pita bread. I love these little middle eastern breads. They are great for scooping sauces or dips such as hummus, to wrap round kebabs or use as a sandwich filled with pulled pork and salad. They are also great as a picnic food! The sourdough version is so much tastier and healthier than the mass produced yeast based commercial alternative. They are so yummy that when I bake them they don’t last very long. But if by miracle you manage not to eat them right away they can be kept frozen for up to 3 months. Then you can simply pop them into toaster straight from the freezer!
You will need to start this recipe in the morning one day before you bake.
Makes 6 small pita breads
Equipment required: large mixing bowl with a lid (or shower cap if you don’t have a lid), baking stone (or flat baking sheet turned upside down)
Ingredients:
- 30g active sourdough starter (“mother”), here you can find how to grow your own starter
- 200g strong white flour
- 120g lukewarm water
- 10g olive oil
- 4g salt
Method:
- In the morning of day one place the starter in the bowl and add 50g water. Mix until the starter is fully diluted in the water.
- Add 50g flour and mix until all ingredients are combined. Cover the bowl and leave to ferment for about 10 hours at room temperature.
- After 10 hours the ferment should be very active with a distinctive smell and multiple air bubbles on the surface. Add the remaining water to the ferment and mix until it is fully diluted.
- Add the remaining flour and mix until all ingredients combine. Sprinkle with the oil and leave for about 30 minutes. Post a picture of the dough on your facebook profile, add few likes on my instagram feed and subscribe to my blog updates if you haven’t already done so. This part is called autolyse and will help with the kneading process later.
- After 30 minutes sprinkle with the salt and knead according to the method described here.
- Cover the bowl again and leave in the fridge for about 20 – 24 hours.
- When you are ready to bake on the second day punch the dough down gently with your fist to release excess of air.
- Lightly dust the work surface with flour. Remove the dough from the bowl and place it on the floured work surface.
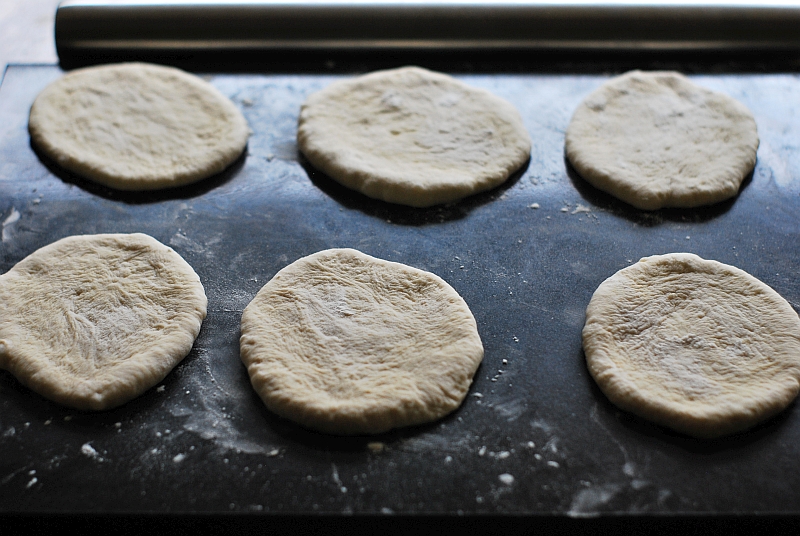
- Divide the dough into 6 equal pieces with a metal dough scraper or sharp knife.
- Take one portion of dough and roll it with your hand to make a ball. Repeat the process with the remaining dough.
- Cover with a tea towel and leave to rest for 10 minutes.
- Ste the oven for 240 centigrade and place the baking stone (or baking sheet) on the middle rack to pre heat.
- Using a rolling pin, roll out each ball to around 0.5cm thickness. Dust lightly with flour, cover and let rise for 10 minutes.
- Place the pita breads on the pre heated baking stone (or baking sheet)
- Bake until completely puffed up. The time will vary, so keep an eye on them. For me it is usually between 5 and 10 minutes. Don’t worry if they look a bit pale, the important thing is that they puff up.
- Set baked breads to cool down on a wire rack. If you don’t serve them immediately, then place them, still slightly warm, in a food bag so that they don’t dry out.

As a purist I grew my sourdough starters in a traditional way with just water and flour as described here. However there is an easier method. It is quicker as it uses kefir, which contains some of the same yeast strains as sourdough. In the UK you can get natural kefir in most decent Polish / eastern European delis.
Glass jar with a lid
Ingredients:
- 50g natural kefir
- 50g flour (white is a little bit less active and gives a less distinctive flavour, rye should give much more active starter with a very distinctive flavour)
- Extra flour for feeding
Method:
- In the jar mix the kefir and flour together.
- Put the lid on, but leave it a bit loose. The jar should be big enough for the starter to double in size without overflowing. Leave it to ferment for about 12 hours at room temperature.
- Add 30g flour and 30g lukewarm water and mix well. Cover with the lid and leave for another 6 – 10 hours at room temperature.
- You should not have your sourdough starter ready for use. Here you can find instructions on how to maintain your starter and keep it healthy.
One thought on “Sourdough pita bread”
Loved this recipe. Worked out perfectly for me. Shame the process takes a while but I guess you can’t rush perfection!